Top 3 Chrome Extensions to Supercharge Your NotebookLM Experience
NotebookLM, Google's AI-powered research assistant, is the only AI technology that has persuaded me that AI can actually revolutionise productivity. Although I haven't used the tool in a while, I'm constantly searching for new methods to improve my workflow and maximise its potential.
That ultimately prompted me to look through the Chrome Web Store for extensions that would help me step it up, and that's how I found these three.
3:-WebSync
No more importing sources yourself
NotebookLM is unique among the hundreds of AI tools available since it only uses the sources you provide it with. If you use NotebookLM, sources are essentially the most crucial component of your workflow. In NotebookLM, an Add sources page appears instantly once you create a notebook. You can upload a variety of file kinds, including PDFs,.txt files, and Markdown files. It is also possible to paste text or upload URLs to websites and YouTube videos.
NotebookLM also offers a function called "Discover sources" that allows you to describe your research topic and it will look up up to ten relevant sources for you. It's a feature that interests me, but I'm not a huge fan. It can be a bit of a nuisance, but I prefer to personally add my sources instead.
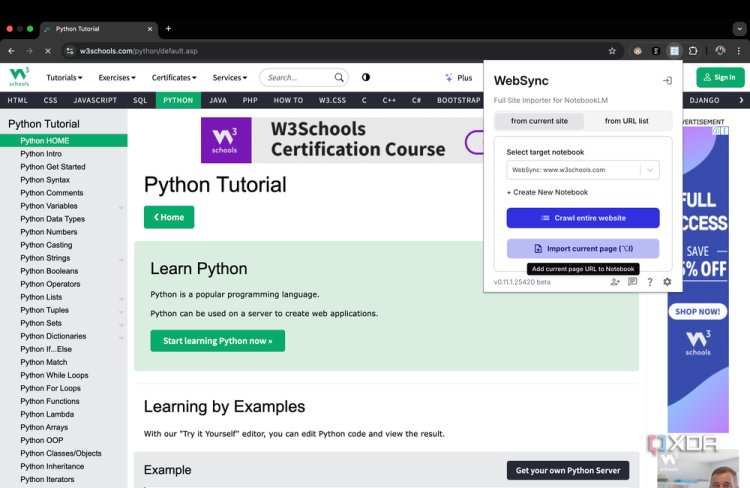
The WebSync addon is useful in this situation. It can import a complete webpage or a single webpage into a NotebookLM notebook with two clicks. To add a webpage as a source to an existing notebook, for example, click the extension icon, choose the notebook you want to use, and then click Import current page. Occasionally, while surfing at random, I've found a webpage that I'd like to investigate further using NotebookLM. Sometimes, in order to swiftly assimilate the information while working, I would prefer to listen to an audio overview of it. I can use Websync to do all of this for me rather than going to NotebookLM, creating a notebook, and then adding the URL to it as a source.
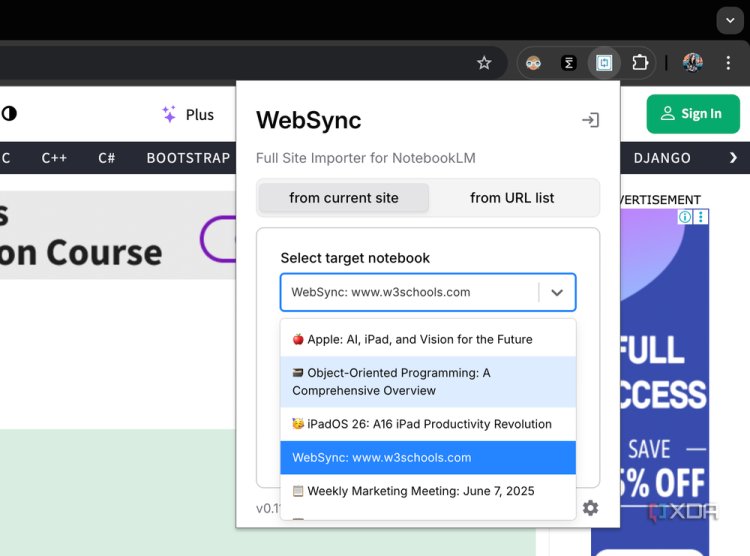
The Select target menu dropdown has a + Create New Notebook option directly beneath it. Simply select the option, and the notebook will be created with the source included. YouTube videos, playlists, and even Reddit subreddits, together with all user comments, can be imported into WebSync. Recently, I connected NotebookLM to Perplexity, an AI search engine, and allowed it to find materials related to the subject of my NotebookLM notebook. Perplexity does an excellent job of locating the sources, however it becomes tedious very quickly because I have to manually add each source it locates to my NotebookLM notebook.
Fortunately, WebSync also works with Perplexity, which has revolutionised my productivity. Likewise, I recently experimented with integrating NotebookLM's Audio Overviews in the Gemini interface, solely due to its incorporation with the Deep Research function. It also only takes two clicks to import Deep Research reports into a NotebookLM notebook using WebSync!
2:-NotebookLM Youtube Link (Source) Automator
Turn your YouTube history into NotebookLM sources
The ability to add YouTube URLs to new or existing notebooks is one of WebSync's more limited features at the moment. A playlist or the YouTube video you're now watching can be added.
Let's imagine you want to make a notepad on NotebookLM to help you study for an organic chemistry exam. If, like me, you prefer to watch a variety of YouTube videos to gain a general understanding of a subject rather than focussing on a single creator's playlist, you'll likely find yourself switching between several videos from various channels. Then you would have to launch the WebSync plugin, open each video, and hit Import current page individually each time. Still, you could probably do that much more quickly by hand.
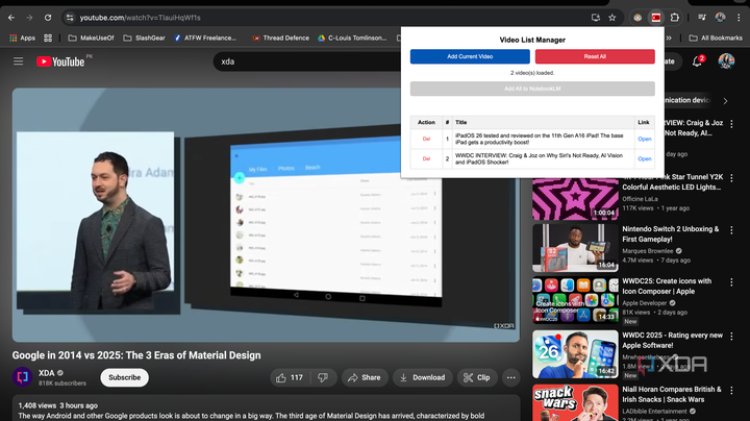
Fortunately, WebSync's problem is resolved by the YouTube Link (Source) Automator addon. You can't do much more with it, unfortunately, because it was made mostly for YouTube videos. After installing it, locate a video that you want to use as a source, open it, click the icon for the extension, and then select the Add Current Video button. Keep doing this for every YouTube video you want to include. When you're finished, go to NotebookLM, click the extension icon, and either open a current notebook or create a new one. The Add All to NotebookLM button, which was previously greyed off, is now visible. Once you press the button, all of your sources will be instantly loaded to your notebook.
1:-Notebook LinkMaster(LM)
Tidy up your notebooks in seconds

Current NotebookLM Google Chrome extensions, such as the two mentioned above, are designed to make adding sources to notebooks easier. Curiously, you cannot manage all of your sources with any of the two without opening your notebook. With Notebook LinkMaster, a Chrome plugin, you can easily accomplish that. The extension will open with a sidebar when you click on it. A new notebook can be made here, notebooks can have URLs added to them, and existing sources can be removed. After you choose a notebook, the Links section will show all of the sources you added to it.
Click the Delete Selected Links button after checking the corresponding box to remove any of them. You would have to hover over an existing source in NotebookLM, click the three vertical dots, and then choose Remove source. You are able to choose every link, but you are unable to remove them all at once. You can use this Chrome addon. Another noteworthy feature of this extension is the Pick links on the page option in the sidebar, which allows you to add YouTube URLs to a notebook straight from the results page. In this manner, you may import each movie to your notebook by simply clicking on its title rather than having to open each one.
It's still a useful function to have, even though I prefer the aforementioned extension for this as I never add a YouTube video as a source before actually watching it.
Enhance your NotebookLM experience
The aforementioned Chrome extensions have undoubtedly increased NotebookLM's usefulness for me, even though they aren't strictly necessary. Ultimately, you have nothing to lose by trying them out because they are all available for free download from the Chrome Web Store.